
Drawing & Making


Painting Colour Theory
In the first lesson of the week, we learnt and explore different paper print companies with their variation of papers, from matte-textured to glossy covers. It was fascinating for me to explore and of course, touch on the different sets of products each company offered.
We also learnt one of the fundamentals of design, which is colour theory, and which kind of theme you intended to go for to invoke a certain emotion towards the target audience. I tried on several combinations on four pieces of watercolour paper with the help of Adobe Colour such as Complimentary, Square and Triad with the 60:30:10 rule.
How do we create visuals to literate the audience on the concept of 60:30:10?
I would say one of the biggest takeaways I learned is to improve on my tidiness and colour blocking as I am someone that is very free-spirited when painting out the brush strokes, which left the result of the patchy and messy result. I should also take note of the ratio of acrylic and water to prevent the patchiness of the strokes.
Another key thing I have learnt is the process of expressing the intended idea to the person viewing your work, which is the ratio of the colours chosen.
Paper Clay Production
Our group started on the Paper Clay process, starting with shredding pieces of recycled paper found at homes, to the size of coins onto a big container before soaking it with water to make the bundles of paper easier to blend down to teeny bits.
Taking the time not only to shred the paper but also to blend it with the right amount of water, which we poured too much inside, leaving the result of a gooey, grey, decomposed-looking concoction.
How do we ensure that the consistency is good enough for moldability yet at the same time not too watery that will take a longer time to dry?
We did not think it through that having a watery mixture along with too-large pieces of shredded paper leaves us more time to wait for the batch to dry up, watery and too thick to mix with the rest of the ingredients to make paper clay.
We started to add the ingredients to make our first batch of clay and it was quite a failure due to the clay not being stretchy or mouldable enough as it was too dry. However, it is still able to retain its shape once dried. Here is what it looks like before partially dried for a few days:


Drying Mess
After a few days, we realized the batch of shredded paper is not completely dry enough before mixing it with other ingredients to finally make our own paper clay. At such perfect timing (sarcasm), the weather started to drizzle too. We moved the paper shreds under shelter and in class and allocated a section of it to be manually hand-dried with wasted tissue paper as well as another section to be dried with a hand dryer.
Who would've thought that using the hand dryer was such a bad idea?
About a third of the paper shreds were spilled onto the floor, wasted due to the strong current from the hand dryer. We felt bad trying to clean the mess up to being caught by the nice cleaner and offering to tidy up the mess we made.
Is there really another way to quickly dry the paper without being wrecked by the wrath of the hand dryer?
I thought of an idea to use the mesh that we rejected due to it being unsuitable for paper-making. We cut pieces of it and tape-wrapped them around some containers. This turned out to be time-efficient and effective.
Mixing of Paper and Other Ingredients
Once dried, we start to experiment with the proportion of paper to the other ingredients. We added corn oil, flour, baking soda, and water. It was obviously rocky at the start as the first batch of paper clay we made was barely moldable due to the paper pieces being too big. It was way too stiff. We retried a few more times to no avail.
We realized the cause was that the paper pieces were too chonky to be mixed in.
After an hour of chopping the paper into teeny tiny fine bits, the mixing turned out to be easier. Of course with the needed guidance and tips from Ivan, we managed to successfully make our first successful test batch, after several failures. We waited until the next week for the batch to dry.


First Molding Process
Once the next week arrives, we checked if the batch was dry enough to start shaping it and it dried pretty well with minimal issues. Of course, it was not perfect as the moment we try shaping, there were cracks of all sizes. Though for our first try, it was good enough.
What notes should be taken when making the next batch?
We knew we needed finer paper shreds immediately and sooner realized the reason why there were still cracks because it was too dry and we might need to add more water or oil and blend better to make the consistency smoother.
Vessel Making
As per our vessel-making assignment, which is to use the paper clay we learned and made it into a physical vessel, I had some ideas. Firstly. just for my own aesthetic pleasure, I found some ideas pertaining to trinkets, which were not really that feasible or interesting. Therefore, I decided to select something that hits home and carried my childhood which was Lego. I made a couple of sketches on how to execute the lego bricks individually as well as the iconic figurine.
Once I was done planning and sketching, I decided to redo the production of paper clay for my own use since the first test of the paper clas was way too clumpy, dry, and crackly for molding.
Learning from the first mixture process previously, I chose to add hot boiling water to the already shredded paper and left it there for a few days with some stirring in between to let the paper dissolve faster and completely soaked up.
After a few days, within an hour of hand blending, the most suitable consistency of paper pulp for mixing is done.
With the experience of mixing the other ingredients to make the paper clay previously, it took lesser attempts of trial and error when adding in the other ingredients. Though there were some notes taken that working with wetter paper pulp is easier to mix in as opposed to drying them out before mixing, although the con is that more flour needs to be added to even out the moistness. However, the paper clay turned out to be the most suitable for moldability.
In order to achieve the block shape of the lego brick pieces, I used some household items that I could find around my house such as a sponge, jewellery case and an adapter. As for the iconic feature of the circular studs, I used the hollow end of the chapstick to mold them.
Starting off with the base was pretty easy as I used clingwrap to seperate from the clay mold to the object. Occasionally, I add water to glue the clay together and cover holes while using clay model tools to shape it better. Although, there were certain areas that were tricky to apply clay such as the corners of the brick and the clay was hard to take out from the hollow part of the chapstick.


Drying & Painting
Once I made enough bricks, I set them out to dry which took about 3-4 days? It took longer due to the rainy season. However. I discovered several patches of mold appearing in one of the bricks.
Why is that the case?
I realised that I added too much water while shaping the clay as well as the humidity from the rainy season contributed to the mold production.
It was also difficult to remove the objects from the mold, which result in a few cracks. With the power of glue, the cracks were mostly managed to be patched together.
As for the lego figurine, learning from the molding process of the bricks, I used less water and made sure the mold is set out to dry in a much drier place, which turned out to be in a faster process of drying.
To recover the issue of the apperance of the mold, several coats of paint were applied not only to cover the green mold, but also to give the vessels a more bright and opaque visual, matching the bright colour of the actual lego bricks. I kind of messed up the face of the figurine but nonetheless, I am satisfied with the colours of the cowboy figurine.
I would say the entire clay process has been pretty tiring but uplifting as I get to try out hands-on exercises while having fun creating my own vessel, even if it might come across as for my own personal self-interest. However, experiencing self-discoveries has always been a joy in this exercise, hopefully I get to maintain the same interest towards the future.


Making Paper out of Wasted Paper
Using the remaining amount of mixture of shredded paper and water, we spread an amount of it out onto a big tub of water. During the stirring process, we were careful to stir in small amounts at a time to ensure the mixture for paper making is not too thick which leads to the paper being too clumpy.
After finding the right amount of water-paper mixture to finally sift out our first piece of paper, we realized that there were still a lot of large shreds of paper that weren’t blended enough, thus leaving a messy result for our first try.
After blending the bits into finer pieces, we wanted to experiment with the color and texture of the paper, so we decided to add dried expired purple flower petals as well as a black dye to achieve a gothic look.
We started to put in our frame and mold onto the blackened dye paper mixture while stirring and lifting it up. It took multiple tries before we get the right amount of mixture to have enough thickness for the mold to dry.
However, despite adding a large amount of black dye to the mixture, it still is not black enough in the mold. Would it be more pigmented if we incorporate the dye onto the initial paper pulp?
Despite not getting enough pigment of the first mold as we wanted, we still moved on to test out our first paper mold. Using the sponges we brought, we press-dried onto the frame, which took some trouble absorbing the paper due to the low and cheap quality of the sponge. The next day, we brought better quality sponges and managed to press dry the paper mold better.
After leaving some molds out to dry for a few days, we got our first batch of paper and send out a piece that we have the most confidence in for test print and it turned out to be successful.
What made it possible for a handmade paper out of recycled paper to be printed?
We realized that other than the thickness of the paper mixture onto the mold, the process of press-drying to make the mold more composite to dry out contributes a lot to the compatibility of the paper for printing.


Paper Fashun Show


My groupmates and I were given an assignment that we were very stoked about, creating garments or pieces of fashion using paper. We decided to create a concept of folded bouquet/fan paper architecture and split ourselves into different roles, such as styling, makeup, and bringing fitting accessories.
I assign myself a role to create a headpiece that matches the concept and found myself some ideas and references that cater to both creativity and efficiency to make within the short given time.
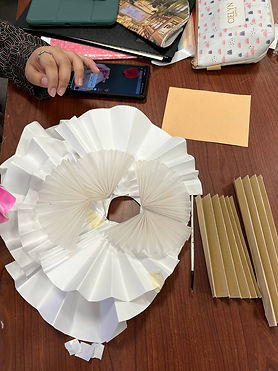
Starting with a base to gauge the size and test-fit onto our model, I cut out a circle that is big enough to paste on the paper components and helps with the structure and sturdiness of the overall hat.
Once done making the base with a pretty thick artcard, my groupmates and I cut out quadrants of different scales and sizes and start to fold them in an alternate manner, mimicking the traditional folds of a fan back in my childhood. We experimented further with incorporating different transparencies of the paper, by including parchment paper.
Following after folding the paper, we assembled them onto the base with double-sided tape.
As we start to test fit our first hat onto our model by her hairstyle, there were some fitting issues.
What would be a way to design the hat that works around the existing spacebuns hairstyle?
We had an idea and decided to cut a hole in the middle to fit through the hairstyle which turned out to be even more pleasing than we anticipated. However, we felt that something was lacking in the hat after putting together all parts of the ensemble. There was not much print or color in our hat so we added streaks of paint matching the body garment.
Other than the many times of touchups and slotting in countless bobby pins onto our model's hair which almost ripped her hair out while cleaning up, we had a blast shooting and editing the video. With confidence, we presented our work and gave our insights from what we learned and observed.
I had tons of fun and of course got experience working with such a large group of talented individuals with their own ideas and working styles, which helped me learn to adapt and overcome the assignment within the short crunch time.
Here are some of my favorite shots:


Learning Adobe Illustrator
It was my first time learning such software as Adobe Illustrator as I did not get the chance to use it during my polytechnic days so not going to lie, I was pretty excited.
Learning the fundamental tools was a breeze for me (my favorite tool was the shape-building tool as it saves so much time combining vectors together without redrawing) and I was slowly getting the hang of it with the great guidance and really helpful tricks and shortcuts given.
There were some tools that I was still iffy about which were the path tool as it was pretty tricky to make the curves seem proper while tracing the reference images due to the lack of meticulousness and control coming from me but with practice over the next few weeks, it got better.
Overall, understanding the creation and manipulation of vectors in softwares such as Adobe Illustrator inspires me to certain art styles towards minimal yet fun shapes as vectors. It turned out to be the staple choice for me to create visuals for my upcoming deliverables and projects.
Although there were a few things I should improve on or experiment with, which are the different layouts and compositions as well as matching a certain color palette that fit well with the concept.


Learning Adobe Photoshop
With prior experience using Photoshop during my polytechnic days for boards and renders, it was pretty easy for me to get used to the familiar tools and functions. In addition to that, I get to learn other features and tutorials such as select and mask, as well as applying certain colors and gradients.
Though there were a few things that are important to note so that I can apply them in the upcoming projects, such as exporting higher-quality photos in a different format than the usual ".jpeg" format from my iPhone.
It is also evident to obtain and use higher resolution photos with more pixels whenever we edit them in Photoshop.
Other than the usual methods of manipulating photos and pixels, we learn the art of color curves and masking, which was like magic. Using masking helps to create our own set of customizations and filters.
In our class assignment, we tried the method of the color curve and masking to create makeup onto a stock model image (it took me forever to find a suitable model with great quality). There were a few hiccups when applying the mask settings but the end result makes the effort and trouble worth it in the end. I was really proud of creating my own natural blush on the subject.
Work In Progress Object
For my topic which is "Agritourism", the goal that I mainly want to achieve is to find out how interested the audience is onto the topic itself before setting out to develop the idea or solution. Although I have already made a survey to gain the better understanding on the perspective of the audience about what they look out for in agri-tourism, I wanted to pull out more collective data using the opportunity to this assignment. Therefore the few main questions I established when doing this deliverable is "Are Singaporeans interested in the topic of Agritourism?" and "Will they try out the different expansions of Agritourism?".
I set out to find some references online and sketch out my ideas based on the concept as well as finding an easy yet effective way to collect data and yet able to visually display it collectively.
The first concept/idea is referencing the structure of corn whereby each kernel contributes to the overall characteristic of the produce itself. Adding on, I wanted to segregate the colours of the kernels differently to represent the opinions of the audience. In terms of executing it into the object, I plan to implement the pinning method where each person uses a pin (representing the kernel) and pins it onto a piece of foam which will be used as the skeleton of the corn.
The second idea focuses more on the question on what expansion of agri-tourism people are interested in which would be more bigger and intricate in size. Using fuzzy cheville wire to represent lavenders with a variety of colours to represent the different options. Initially, I planned to do both models but I decided to drop this idea and preoceeded with the corn concept due to the constraint and lesser use of resources needed.
I got a list of materials needed to contruct the model which is mainly foam as the base, grass paper for texture and rawness of the ground, pins of different sizes for testing, clay for molding other elements and fake plants to accentuate the look. I looked around for craft foam or polysterene foam to shave it into the corn shape but to no avail so I opted for a normal foam instead.
Starting out with a rough sketch with dimensions, as well as finding the overall shape using picture references, I started to shave out part by part from the original foam cylinder into the intended corn shape, which took a couple of hours. Fortunately, there were not much hiccups.
After shaving, I cut out the grass paper into the shape of the base foam and taped the top and sides. Trimming out the excessive stems and branches of the fake flowers and plants, I poked them through the foam base while securing it better with glue. The final few touchups of moss, molded and painted mushroom made out of clay completed the entire ensemble, ready to set out for the WIP testing.
On the day of WIP testing, I discovered that the foam corn model was too flimsy while attempting to attach a pin to it, therefore I poked a chopstick as a structure to bind the corn and the base. Within the timelapse of the WIP visits, there are a few notes of feedback, some complimenting the setup, while more importantly, talking about the entire experience from reading out the instructions to putting their feedback. Several people mentioned about the pins being abit inconvenient to attach while others mentioned about not understanding the instructions.
Overall, I had fun starting from the ideation of the object as the extension of my topic, setting up and gaining feedback to further improve the object for exhibition. Of course, it was also eye-opening to witness my coursemates amazing ways of data collection that I can definitely learn and infer from.
Moving forward, I definitely will use this object once completed as a overall visualisation on the awareness and interest of SIngaporeans towards agri-tourism.


